Different Headings in HTML:
This is an h1 (This is the Main Heading of the page)
This is an h2 (This should be the subheading of h1)
This is an h3 (This should only be the subheading of h2)
This is an h4 (This should only be the subheading of h3)
This is an h5 (This should only be thesubheading of h4)
This is an h6 (This should only be thesubheading of h5)
[ Original code: <h1>This is h1 </h1>]
[ Original code: <h2>This is h2 </h2>]
[ Original code: <h3> This is h3 </h3>]
[ Original code: <h4> This is h4 </h4>]
[ Original code: <h5> This is h5 </h5>]
[ Original code: <h6> This is h6 </h6>]
A Few Important tags
- <p> is used to make paragraphs.
- <b> or <strong> is used to make text BOLD.
- <i> or <em> is used to make text italics.
- <hr> makes a horizontal line.(This is a Self-Closing tag i.e; it does not have </hr>)
- <br> gives a line break ( This is also a Self-Closing tag . Anything you write next will be written in the next line).
- <sup> wraped around a text will elevate and dimnish the text like this: 23=8
- <sub> wraped around a text will lower and dimnish the text like this: H2O is Water.
- <mark> wraped around a text will highlight the text like this: Be Strong
Let's learn to make an Ordered list:-
- Banana
- Apple
- Mango
Let's learn to make an Unordered List
- Banana
- Apple
- Mango
Let's learn to Link a Web Page
Linking a Web Page from your PC
If the the file is in the SAME FOLDER then you can directly write the name like :
This is my <a href="LEARN.html" target="_BLANK"> LEARN Page </a>- It is important to have all your files, images together when making a website .
Let's learn to insert Images
Uploading Images from your PC
If the image is stored in the same folder then you can write thr name of the image in is source (src).
- If it is stored somewhere else you can locate the file or image and copy the file path and paste it in the source (src) .
Grouping you Content
-
<div> is used to group parts of your webpage. In the above Example, the image and the h2 is grouped.
This allows us to style them together using CSS which you will learn later.
The DIV takes up its own line in the Web Page which is why the giberish after the DIV is moved towards the next line . -
<span> is used to group text so that you can style it later with CSS.
Example:This is a Special Sentence
[Original code:
This is a <span> Special Sentence </span> ] Semantic Elements
Entity Codes
Making a Table
Points To Remember While making a Table
- All the tags within the table have an opening and a closing tag.
- You can write the title of your table in the <caption> which will apppear in bold and will be centred.
- You can make a table without using the table head and table body. So in the above code if you remove the <thead> and <tbody> , the result will not change. These are used to organise the code.
- It is important to use <thead> in the first row to determine your headers in the table .
-
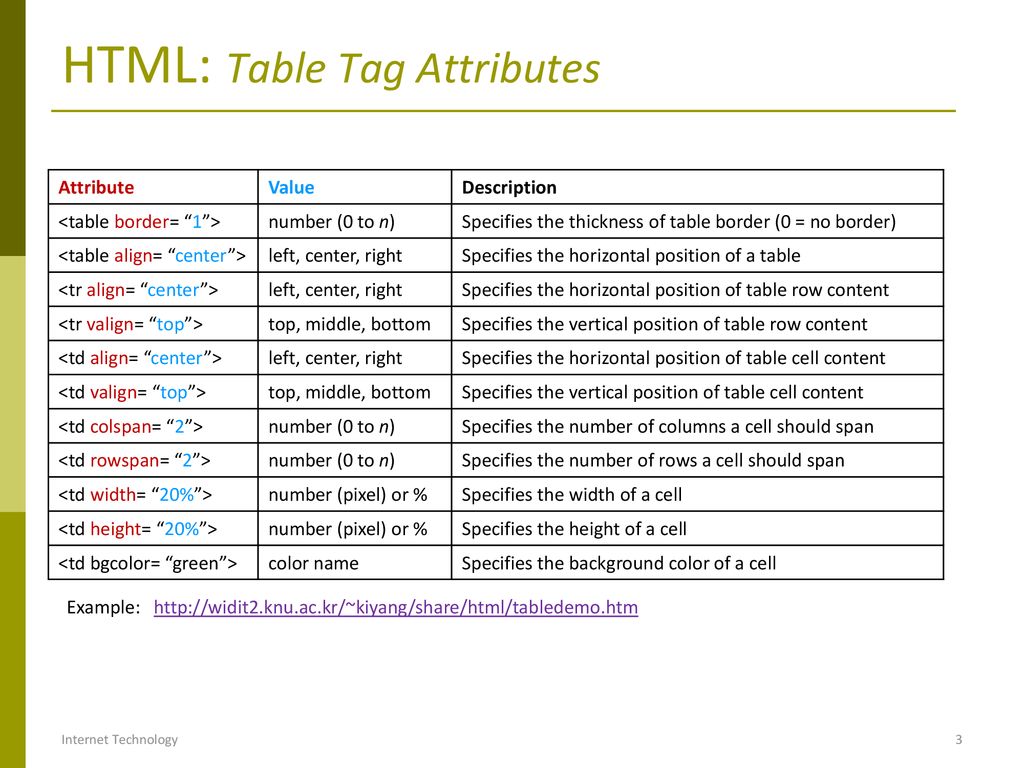
You can specify the rows or columns a table header can take by using colspan or rowspan. There are more attributes such as :

Making a Form
- You can use the attribute of "required" in an <input> to make sure that a user fills it in.
- For a <form> element, the name attribute is used as a reference when the data is submitted.
- When you are grouping multiple <radio> under a single genre then they should have the same <name>.
- When using <input type="number">, you can use the min=" " and max=" " attributes to specify the minimum or maximum value to be set.
- When using <input type="text">, you can use the minlength=" " and maxlength=" " attributes to specify the minimum or maximum characters to be allowed.
This is a paragraph.
[Original code:
<br>
<p>
<em> This </em> is a <strong> paragraph. </strong>
</p>
<hr> ]
Example:
To start an ordered list we use <ol> tag . To write a list item we use <li>.
[Original code:
<ol>
<li>Banana</li>
<li>Apple</li>
<li>Mango</li>
</ol> ]
Example:
To start an unordered list we use (< ul >) tag . To write a list item we use (< li >)
[Original code:
<ul>
<li> Banana </li>
<li> Apple </li>
<li> Mango </li>
</ul> ]
Example:
This is Google's Website
We use an Anchor tag which is <a> </a>.
The a tag has a special attribute called href which goes in the opening tag ( <a href=" "> ) whose value is the link or path(if you are hosting locally on pc ) for the website .
The text to be displayed goes between the opening and closing tag <a> HERE </a>.
target="_BLANK" is added to tell the browser to open the in in another tab.
[Original code: <p>This is <a href="https://www.google.co.in/" target="_BLANK">Google's Website </a> </p> ]
Example:

Example:
To insert an image we use <img> tag which is a self closing tag. The image tag has 4 attribute which are
<img src="" alt="" width="" height="">
The link for the image goes in the source (src),
the name of the image goes in the alternative (alt) for the screen readers which blind people use.
You want can specify width and height of the image in pixels (px)
[Original code:
<img src="https://www.bing.com/th?id=OIP.6Woov2nyH214udwehZZlGAHaE8&
w =128&h=100&c=8&rs=1&qlt
=90&pid=3.1&rm=2" alt="Silkie Chicken" width="150px" height="100px">
]
Example:

Example:

Landscape Art
[Original code:
<div>
<img src="Images\groupland.jpg" width="490px" height="300px" alt="">
<h2>Landscape Art</h2>
</div>
]
Semantic HTML is the correct use of HTML to reinforce the meaning of content on a web
page, rather
than merely define
its appearance.
Semantically correct HTML helps search engines, screen readers, and
other user
devices determine the
significance and context of web content.
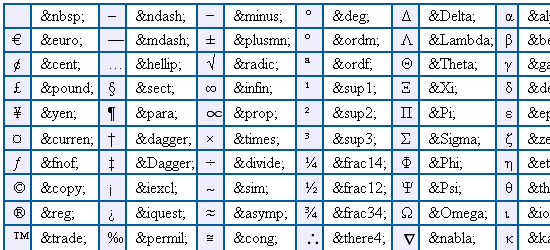
Entities are frequently used to display reserved characters (which would otherwise be interpretedas HTML code), and invisible characters (like non-breaking spaces) as normal text on screen.

Example:
The Chicken Inc. ®
[Original code:
<p>The Chicken Inc. <sup> & r e g </sup> </p> ]
Example:
| Name | Class | Number |
|---|---|---|
| Nimo | 9 | 911*** |
| Dori | 10 | 200*** |
| Silkie | 12 | 100*** |

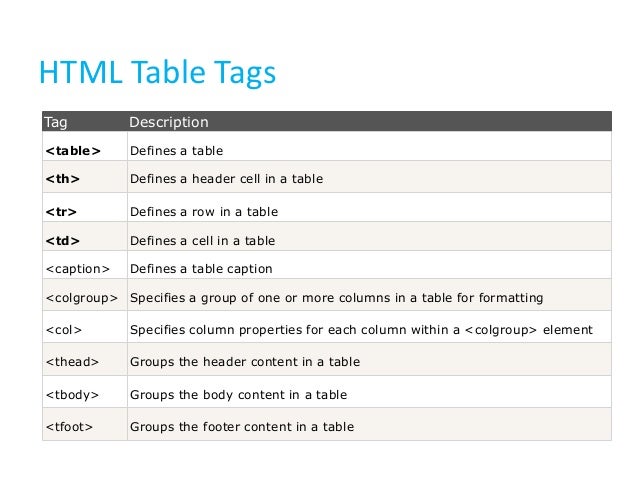
The table has an opening tag (<table>) and closing (</table>) tags. The table is dividided into 2 parts which are table head ( <thead> ) and table body ( <tbody> ).
The table head contains the the header for each colomn and the table body contains the data for the particular colomn.
In the table head we need to to declare a table row ( <tr> ) and write our headers in table head ( <th> ) something like this:-
<thead>
<tr>
<th>Class </th>
<th>Number </th>
</tr>
</thead>
This will create the headers for the table.
In the table body, we need to create a table row (<tr>)and write the colomn data in the table data ( &Lttd> ) .
<tbody>
<tr>
<td>9 </td>
<td>911*** </td>
</tr>
</tbody>
This will make the second row of the table.
The rest of the table will follow the same format with 3 <td> in 1 <tr>.

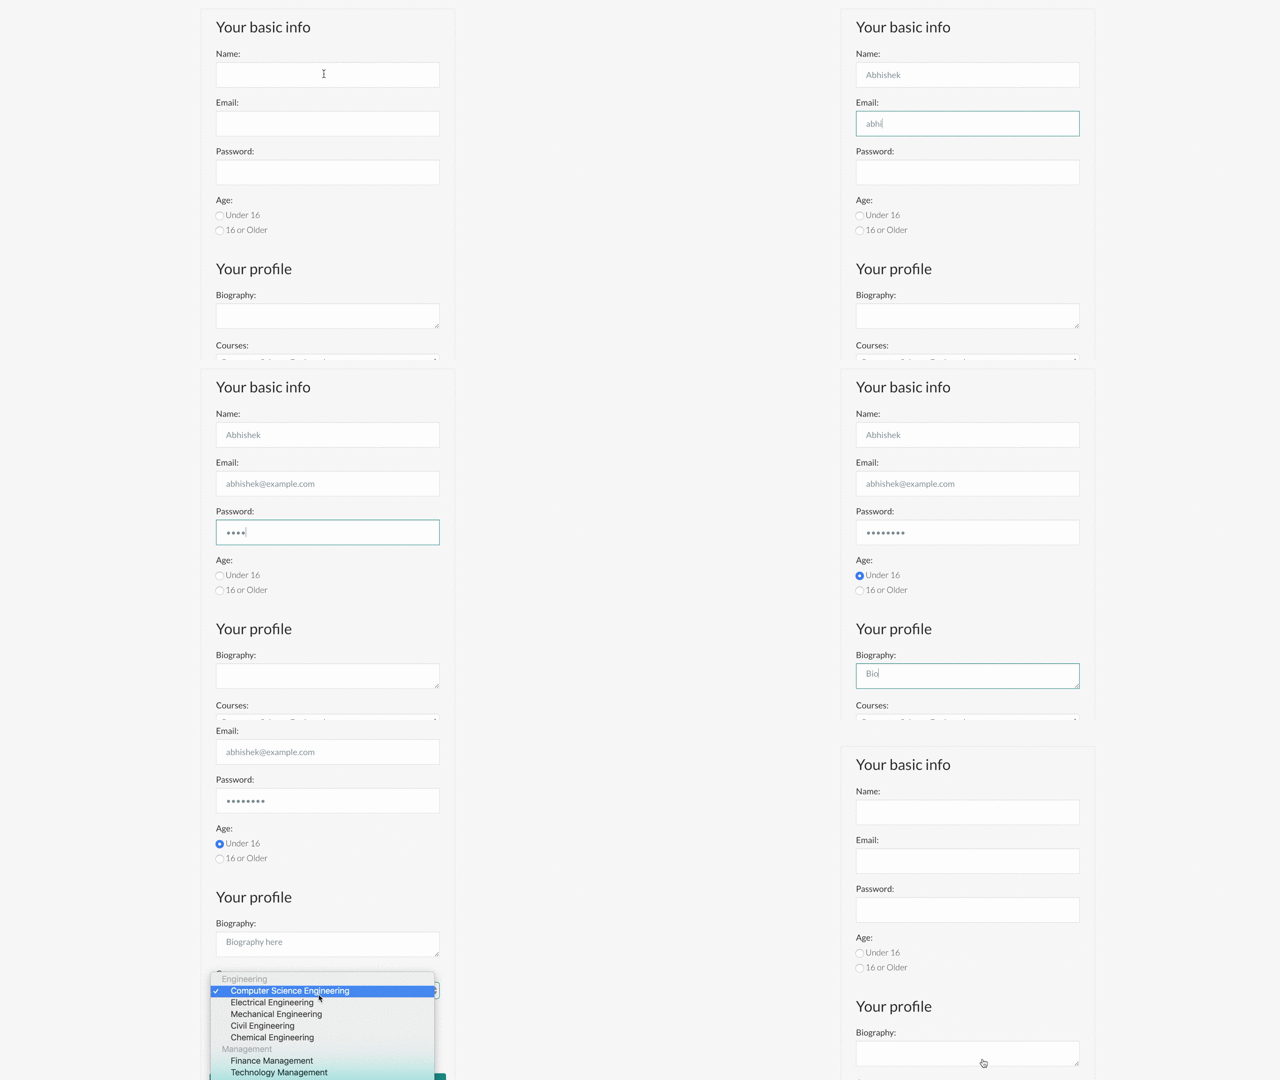
An HTML form is used to collect user input. The user input is most often sent to a server for processing.
Tags in Forms:
To start a form we need <form> tag. As you have seen there are different types of inputs in a form so we need to have a an <input> tag which is a self closing tag. the input tag has an attribute which is type which defines the type of input. Then we hava a <lable> tag which is put before or after the input as a lable to the input . This is used by screen-readers.Example:
Original code:
[<label for="fname">First name:</label>
<input type="text" id="fname" name="fname">]
→ The lable tag will put a name against the input.
→ The input tag type defines the type of input. The <lable> tag tells the screen-reader and the server that a certain lable goes with an input.
→ This can be done by giving the giving the lable tag an attribute of for whose value can be anything(in this case "fname") and giving the input an attribute of id whose value is "fname".
Types of Input:
| Type | Description |
|---|---|
| <input type="text"> | Displays a single-line text input field |
| <input type="radio"> | Displays a radio button (for selecting one of many choices) |
| <input type="checkbox"> | Displays a checkbox (for selecting zero or more of many choices) |
| <input type="submit"> | Displays a submit button (for submitting the form) |
| <input type="button"> | Displays a clickable button |
| <input type="reset"> | Resets the whole form |
| <input type="password"> | Displays an input field for Passwords |
| <input type="gmail"> | Displays an input field for Gmail |
| <input type="number"> | Displays an input field for Numbers |
| <input type="color"> | Displays a Color palette |
| <input type="range"> | Displays an allowed range of values |
| <input type="date"> | Displays a calender to pick a date |